Do I Need a Professional to Install My Dash Cam Or Can I Do It Myself?
Most dash cams do not need professional installation. A basic plug-in setup takes 15 to 30 minutes and requires no tools. However, if you want parking mode or a hidden cable finish, hardwire installation involves your fuse box — and that is when hiring a professional makes real sense.
I bought my first dash cam three years ago. I stared at the box for twenty minutes, convinced I was about to destroy my car’s electrical system. Spoiler — I didn’t. I had it running in under half an hour.
But here is the thing. Not every installation is that simple. I’m Alex Rahman, and I’ve helped dozens of drivers set up dash cams — from five-minute plug-and-play jobs to full hardwire installs with rear cameras and parking mode. There is a massive difference between the two.
The answer to “do I need a professional?” depends entirely on what type of installation you need. This guide breaks it all down — clearly, honestly, and without technical jargon.
- Plug-in dash cam installation takes 15-30 minutes and needs no tools or experience.
- Hardwire installation connects to your fuse box — it’s more complex and suits confident DIYers or professionals.
- Parking mode only works with a hardwired setup, making it the main reason to go beyond a simple plug-in.
- Professional installation costs between $50 and $150 on average, depending on complexity.
- Lease cars and new vehicle warranties can be affected by improper hardwire installs — know the rules first.
What Does Dash Cam Installation Actually Involve?
Dash cam installation means mounting the camera, routing its power cable, and securing it so it doesn’t shift while you drive. The complexity ranges from “anyone can do this” to “you genuinely need an electrician.” Which level you need depends on your camera type and what features you want active.
There are two main paths. The first is a simple plug-in. The second is a full hardwire. Each serves a different driver with different needs.
Plug-In Installation — the Simplest Method Anyone Can Do
Plug-in installation uses your car’s 12V power socket — the cigarette lighter port — to power the dash cam. You mount the camera on the windshield, run the cable along the edge of the glass, tuck it under the trim, and plug in. Done.
This method works for Nextbase, Garmin Dash Cam, Vantrue, and virtually every major brand. Most front-only cameras come with a 12V cable in the box for exactly this reason.
The downside? Your camera only runs when the ignition is on. The moment you park and walk away, it stops recording. If protecting your parked car matters to you, plug-in alone won’t cover it.
Hardwire Installation — What Makes It More Complicated
Hardwire installation connects your dash cam directly to your car’s fuse box using a hardwire kit — a small adapter with two fuses and a voltage cutoff. This gives the camera a constant and switched power source, which enables parking mode.
The job involves locating your fuse box (usually under the dashboard or in the footwell), identifying the right circuits, connecting the hardwire kit safely, and routing all cables cleanly out of sight. It takes 1 to 3 hours depending on your car and your experience level.
This is where many drivers pause. The words “fuse box” and “electrical circuit” feel intimidating. And honestly? They should command respect. But they don’t have to mean “call a professional” — as long as you understand what you’re doing.
What Tools Do You Need to Install a Dash Cam at Home?
For a plug-in install, you need no tools at all. A plastic trim removal tool (also called a pry tool) helps tuck cables neatly, but even that is optional. Most kits include a small hook tool for exactly this.
For a hardwire install, here is what you actually need:
- A hardwire kit (usually sold separately or in the box with premium cameras)
- A fuse tester or multimeter — to identify live and switched circuits
- Plastic trim removal tools — to pull panels without scratching
- Electrical tape or small cable ties — for securing wires cleanly
- A flathead and Phillips screwdriver — for any panel screws
None of these tools are expensive. A basic trim tool set costs under $15. A fuse tester runs about $10. If you already have screwdrivers, you’re mostly set.
Buy a cheap fuse tester before touching your fuse box. Connecting to the wrong circuit can blow fuses or, in rare cases, cause electrical faults. A $10 tester removes all guesswork.
How Hard Is It to Install a Dash Cam Yourself — Honest Difficulty Ratings
Here is a straight difficulty breakdown so you know exactly what you’re walking into before you start.
| Installation Type | Difficulty | Time | Tools Needed |
|---|---|---|---|
| Plug-in (12V socket) | Very Easy | 15–30 min | None |
| OBD Port Power | Easy | 20–40 min | Trim tool |
| Hardwire (front only) | Moderate | 1–2 hours | Kit + tester |
| Hardwire (front + rear) | Hard | 2–4 hours | Full kit + panels |
| Rear camera + parking mode | Very Hard | 3–5 hours | Professional level |
If you fall into the “hard” or “very hard” rows above, a professional installer earns their fee in time saved and mistakes avoided.
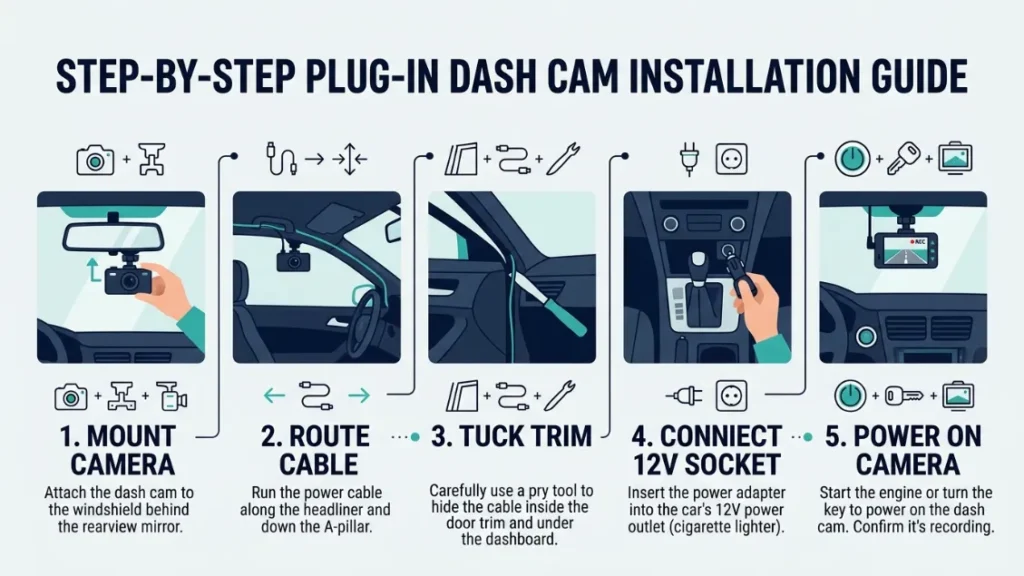
How to Install a Dash Cam Step by Step (Plug-In Method)
The plug-in method is genuinely beginner-friendly. Follow these steps and you’ll have a working dash cam in about 20 minutes.
- Clean your windshield where the mount will sit — usually top center or behind the rearview mirror.
- Attach the mount to the windshield using the suction cup or adhesive pad included in the box.
- Clip the dash cam onto the mount and adjust the angle so the lens points straight ahead.
- Run the power cable along the top edge of the windshield toward the A-pillar (the trim column beside the windshield).
- Use a trim removal tool or your fingers to tuck the cable behind the A-pillar trim, running it down toward the footwell.
- Route the remaining cable along the bottom trim toward the 12V socket on the dashboard or center console.
- Plug the cable into the 12V socket and start the car — the dash cam should power on automatically.
- Format the memory card through the camera’s settings menu before your first drive.
Always warm your windshield adhesive mount slightly before pressing it on. Cold glass reduces adhesion, and a falling camera while driving is a real hazard.
When Does a Dash Cam Need to Be Hardwired to Your Fuse Box?
A dash cam needs hardwiring when you want it to run while the car is parked and the engine is off. This is the single biggest reason drivers move beyond a plug-in setup. Hardwiring connects the camera to your vehicle’s electrical system directly, giving it access to both a switched (ignition-on) and constant (always live) power source.
According to a 2023 survey by Which? Consumer Research, over 40% of dash cam owners listed parking mode as a top priority when buying — yet most still rely on plug-in power that makes parking mode impossible.
What Is Parking Mode and Why Does It Require Hardwiring?
Parking mode keeps your dash cam recording — or on motion-triggered standby — even after you lock the car and walk away. It catches hit-and-runs, vandalism, and break-in attempts. Blackvue and Vantrue both offer excellent parking mode performance on their hardwired models.
It requires hardwiring because your 12V socket goes dead when the ignition turns off. The fuse box, however, has circuits that stay live at all times. A hardwire kit taps into those circuits safely — and includes a voltage cutoff that prevents your car battery from draining flat overnight.
What Is an OBD Port and Can It Replace a Full Hardwire?
The OBD port (On-Board Diagnostics port) is a diagnostic socket usually found under your dashboard, near the steering column. Some dash cam brands sell OBD adapters that plug into this port and power your camera — no fuse box access needed.
It’s a middle-ground option. Easier than a full hardwire, but with limitations. Not all OBD ports deliver consistent voltage, and some vehicles disable the port when the ignition is off — which kills parking mode anyway. Check your specific car model before buying an OBD power adapter.
Never connect a hardwire kit to a constant-power circuit without a voltage cutoff. Without it, the camera draws power all night and can leave your battery completely dead by morning — especially in cold weather.
How to Hide Dash Cam Cables So Your Car Looks Factory Clean
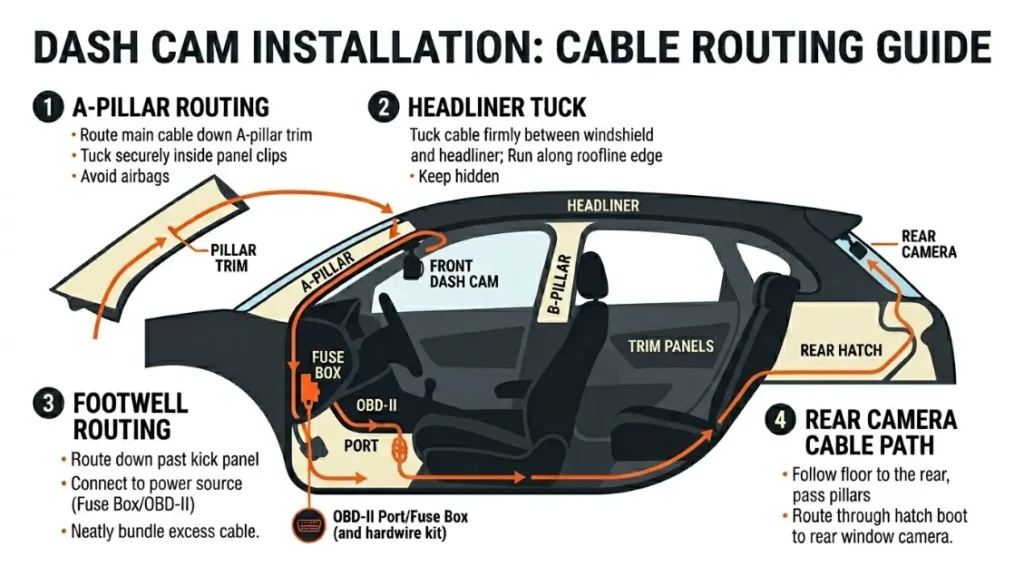
Hiding cables properly makes the difference between a cheap-looking install and one that looks like it came from the factory. The goal is to keep every cable tucked inside trim panels — never draped across the dashboard or dangling down the windshield.
Here is how to get a clean finish:
- A-pillar routing: Tuck the cable behind the rubber seal at the windshield edge, then push it inside the A-pillar trim cover. This hides the full vertical run.
- Headliner tuck: Gently push the cable into the gap between the headliner and the windshield trim for the horizontal run across the top.
- Footwell routing: Bring the cable down the A-pillar, through the footwell, and along the sill trim toward your power source.
- Rear camera cable: Run it through the headliner, across the roof, and down the C-pillar (rear trim column) to the back camera. This is the most time-consuming part of any dual-camera install.
Clean cable routing uses the A-pillar, headliner edge, and door sill trim to hide every wire from view. A plastic trim tool makes this easy without scratching panels. Front-only installs take 30 minutes with good routing. Adding a rear camera can add another 90 minutes.
How Much Does Professional Dash Cam Installation Cost?
Professional dash cam installation typically costs between $50 and $150 in the US, and between £40 and £120 in the UK. The price varies based on installation complexity, your vehicle type, and where you go.
| Service Type | Average US Cost | Average UK Cost |
|---|---|---|
| Plug-in fitting only | $30–$50 | £25–£40 |
| Front hardwire only | $60–$100 | £50–£80 |
| Front + rear hardwire | $100–$150 | £80–£120 |
| Front + rear + parking mode | $120–$200 | £100–£150 |
Best Buy and Halfords both offer in-store fitting services. Independent auto electricians often charge less and deliver better results — especially for complex hardwire jobs. Always confirm whether the labor fee includes the hardwire kit, or whether you need to buy that separately.
Do You Actually Need a Professional to Fit Your Dash Cam?
Here is the honest answer — and it depends on four factors: the type of install, your confidence with car electrics, the complexity of your vehicle, and whether you have parking mode.
The rule is simple: If your camera plugs into a 12V socket, install it yourself. If it needs to connect to your fuse box — especially in a newer or lease vehicle — hire a professional or at minimum do thorough research before touching anything electrical.
Use this decision guide:
- Plug-in, front-only: Do it yourself. No experience needed.
- Plug-in, front + rear: Still DIY-friendly. Cable routing takes patience but no electrical risk.
- Hardwire, front-only, older car: Confident DIYers can handle this with a good guide and a fuse tester.
- Hardwire, front + rear, parking mode: Hire a professional unless you have prior automotive electrical experience.
- Hardwire, new car under warranty or lease vehicle: Always hire a professional — mistakes here carry real financial risk.
Can Dash Cam Installation Void Your Car Warranty or Lease Agreement?
A plug-in installation will not void your warranty. Plugging into a 12V socket is no different from charging a phone — it carries zero risk to your warranty or lease. Hardwire installation is where things get more complicated.
In the US, the Magnuson-Moss Warranty Act (1975) protects consumers — a dealership generally cannot void your warranty simply because you added an aftermarket accessory. However, if a hardwire install causes electrical damage, that specific damage may not be covered.
For lease vehicles, the stakes are higher. Most lease agreements require the car to be returned in original condition. A poorly hidden hardwire with trim damage or a blown fuse could result in charges at return. If you lease your car, check your agreement before drilling or wiring anything.
Always photograph your car’s interior before any installation. If you lease, get written confirmation from your leasing company about what modifications are permitted. This protects you at return.
For more on vehicle modification rights, the FTC’s guide to federal warranty law is worth reading before you start.
What Are the Most Common Dash Cam Installation Mistakes — and How Do You Avoid Them?
Most installation problems come from rushing or skipping one of these common error points. Know them before you start, and your install goes smoothly.
- Mounting in the driver’s sightline: The camera must sit behind the rearview mirror — not in the center of the glass. Anything in your direct sightline is illegal in most states and countries.
- Skipping the memory card format: Always format a new card inside the camera, not on your computer. Dash cams use a specific file system — a computer format can make the card unreadable for loop recording.
- Connecting to the wrong fuse circuit: Tapping a constant-power circuit for a switched-power connection (or vice versa) causes the camera to stay on all night or not turn on at all. Use a fuse tester every time.
- Not using a voltage cutoff hardwire kit: Some generic hardwire kits skip the voltage cutoff. Without it, your car battery can drain overnight. Always buy a kit with a built-in low-voltage shutoff.
- Loose cable routing: Cables that aren’t fully tucked can rattle at speed, fall loose, or distract you mid-drive. Take the time to tuck every centimeter properly.
If you are unsure about your fuse box, download your car’s manual from the manufacturer’s website — it usually includes a full fuse box diagram with each circuit labeled. This saves you hours of guessing.
For detailed guidance on dash cam regulations by state, the Insurance Institute for Highway Safety publishes regular updates on driver assistance technology rules.
Conclusion
The honest answer? Most drivers do not need a professional to install their dash cam. A basic plug-in setup is genuinely beginner-friendly — it takes 20 minutes and needs no tools whatsoever.
The line shifts when hardwiring enters the picture. Fuse box connections, parking mode, and dual-camera setups raise the stakes. If you’re not confident with car electrics, a professional installation is money well spent — and it protects your warranty and lease agreement too.
As I always tell drivers: install what you’re confident in, and get help for the rest. There is no shame in hiring a professional for a job that involves your car’s electrical system. What matters is that your camera is fitted safely, legally, and actually works when you need it.
— Alex Rahman
Frequently Asked Questions

I’m Alex Rahman, a car enthusiast and automotive writer focused on practical solutions, car tools, and real-world driving advice. I share simple and honest content to help everyday drivers make better decisions.