How to Install a Dash Cam Properly: DIY vs Professional
To install a dash cam, mount the camera behind your rearview mirror, choose a power source — cigarette lighter, OBD-II port, or hardwire kit — then route the cable along the headliner and A-pillar trim. DIY takes 30 to 90 minutes. Professional installation costs $50 to $150 and delivers cleaner wiring.
The first time I tried installing a dash cam, I made a rookie mistake. I just stuck it on the windshield, plugged the cable into the cigarette lighter, and let the cord dangle across my dashboard like a sad noodle. It worked — but it looked terrible, and it was a distraction every time I glanced over.
I’m Alex Rahman, and I’ve helped dozens of drivers get their dash cams installed cleanly and correctly. After testing cameras from brands like Nextbase, Vantrue, and BlackVue, I can tell you this: the camera you buy matters less than how well you install it.
A poorly installed dash cam can fall off the windshield mid-drive, drain your battery overnight, or create blind spots that actually make driving more dangerous. A well-installed one? You forget it’s there — until you need it most.
This guide covers everything. Mounting position, power source options, cable hiding tricks, rear cam installation, hardwiring your fuse box, and the honest truth about when DIY makes sense and when you should just pay a professional.
- Mount your dash cam behind the rearview mirror — not on the driver’s side where it blocks your view.
- A cigarette lighter adapter is the easiest power source; hardwiring is the best for parking mode.
- Hiding cables along the A-pillar and headliner takes 20 extra minutes and makes a huge difference.
- Rear dash cam installation is harder — a longer cable run means more time and patience.
- Professional installation is worth it for hardwired, multi-camera, or complex vehicle setups.
What Is a Dash Cam Installation and Why Does It Matter for Your Safety?
Dash cam installation is the process of mounting a recording camera inside your vehicle, connecting it to a power source, and managing the wiring so it operates cleanly and consistently. Done right, it records every drive automatically with zero input from you.
A properly installed dash cam gives you video evidence after an accident. It protects you from insurance fraud — staged crashes cost drivers billions of dollars every year. In the UK alone, dash cam footage was used in over 100,000 insurance claims in 2022, according to Aviva Insurance.
But the installation itself is what determines whether your camera actually works when it matters. A loose suction mount can fall off in summer heat. A dangling cable can distract you or block a vent. A wrongly wired hardwire kit can drain your car battery flat overnight.
Getting the install right is just as important as choosing the right camera.
What Happens If You Install It Incorrectly?
A bad dash cam installation causes real problems. A suction cup mount can detach when temperatures rise above 25°C, which is common inside a parked car on a sunny day. If it falls while you are driving, that is a serious distraction — and in some countries, it is a fineable offense.
Incorrect fuse box wiring is the bigger risk. Tapping the wrong fuse — one that stays on when the car is off — can drain your 12V battery completely in under 24 hours. Replacing a battery costs $80 to $200. That is an expensive mistake for a $5 error.
Never tap an always-on fuse for a basic dash cam installation without a voltage cutoff relay. Always-on fuses supply power even when the ignition is off. Without a cutoff, your camera will drain the battery and you will not start your car the next morning.
What Tools and Materials Do You Need Before You Start?
A basic dash cam install needs only a few simple items. Having everything ready before you start saves you stopping halfway through to search the garage.
For a standard cigarette lighter or OBD-II install, you need:
- Your dash cam and its included power cable
- A plastic pry tool or trim removal tool (also called a panel popper)
- A cable tuck tool or a flat-head screwdriver wrapped in tape
- Cleaning alcohol wipes (for the windshield mounting surface)
- Optional: cable clips to secure the wire along the headliner
For a hardwire installation, you also need:
- A hardwire kit (specific to your dash cam brand or a universal one)
- A fuse tap or load tap adapter — ATM, ATO, or mini blade type, depending on your car
- A multimeter (to identify switched vs always-on fuses)
- A ring terminal for the ground wire
- Electrical tape or heat shrink tubing
Trim removal tools cost around $8 to $15 and prevent scratching your A-pillar or headliner. Do not skip them.
Search “[your car make and model] fuse box diagram” on YouTube before starting a hardwire install. You will find the exact fuse positions for your vehicle in minutes — no guesswork needed.
Where Should You Mount a Dash Cam on Your Windshield?
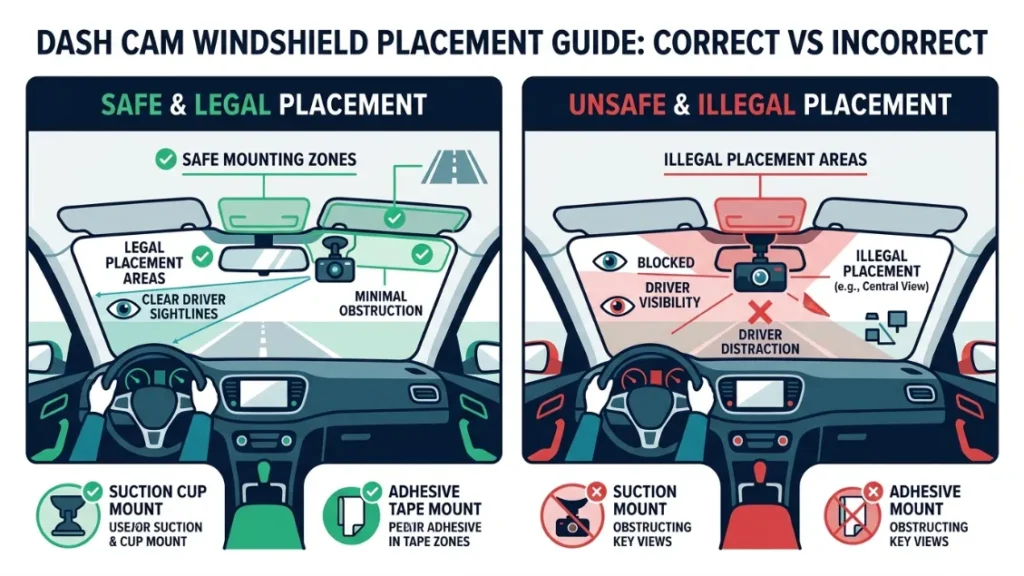
Mount your dash cam centered behind the rearview mirror, tucked as close to the top of the windshield as possible. This position keeps the camera out of your line of sight while giving it the best forward view of the road.
Most cameras — including popular models from Garmin Dash Cam and Nextbase — ship with a suction cup mount or an adhesive mount. Both work, but they behave differently.
Suction cup mounts are easier to reposition. They grip glass securely in normal conditions. The downside is that high interior temperatures — which can hit 70°C in a parked car in summer — weaken the suction seal over time.
Adhesive mounts are stronger and more permanent. Nextbase’s Click&Go magnetic adhesive system, for example, locks onto the windshield with a hold rated to withstand sustained vibration. Once it is set, it does not move.
Clean the glass with an alcohol wipe first regardless of which mount type you use. A single fingerprint under an adhesive pad cuts the holding strength significantly.
Is Dash Cam Placement on Your Windshield Legal?
In most countries, you must place your dash cam in a zone that does not obstruct driver vision — typically the top 20% or bottom 5% of the windshield. In the United States, laws vary by state. California Vehicle Code 26708, for example, restricts objects mounted in the driver’s direct line of sight.
In the UK, the Highway Code requires that dash cams do not obstruct the driver’s view. Placing a camera in the center-top behind the rearview mirror satisfies legal requirements in most markets.
Always check your country or state’s specific windshield obstruction law before mounting. A $20 ticket defeats the purpose of the investment.
What Are the Three Ways to Power a Dash Cam — and Which One Is Right for You?
You can power a dash cam three ways: through a cigarette lighter adapter, through an OBD-II port, or through a hardwired fuse box connection. Each method has a different difficulty level, cost, and set of capabilities.
| Power Method | Difficulty | Parking Mode | Cost | Best For |
|---|---|---|---|---|
| Cigarette Lighter | Beginner | No | $0 (included) | First-time installers |
| OBD-II Adapter | Easy | Limited | $10–$25 | Drivers who want a cleaner look |
| Hardwire Kit | Intermediate | Yes (full) | $15–$40 | Parking mode and permanent install |
Cigarette Lighter Adapter: The Easiest Option for Beginners
Plugging your dash cam into the cigarette lighter socket is the fastest and simplest install. You mount the camera, plug in the cable, and you are done in under 15 minutes. The camera starts recording when you turn the ignition on and stops when you turn it off.
The main limitation is that this method does not support parking mode. The socket loses power when the ignition is off, so the camera cannot record when your car is parked. It also leaves a cable running visibly across your dashboard if you do not tuck it away.
This method is a solid starting point for most casual drivers who just want basic accident recording during their commute.
OBD-II Adapter: The Middle Ground Most Drivers Miss
An OBD-II power adapter plugs into the diagnostic port under your dashboard — the same port mechanics use to read fault codes. This keeps your cigarette lighter free and provides a tidier cable run. Most OBD-II ports also remain powered for a short time after the ignition turns off, giving limited parking mode support on some vehicles.
The catch is that OBD-II adapters draw power even when the car is parked. Extended parking mode use can drain the battery if the vehicle sits unused for several days. It is a better option than the cigarette lighter adapter — but not a replacement for a full hardwire install if parking protection matters to you.
Hardwire Kit: The Best Option for Parking Mode and Clean Wiring
A hardwire kit connects your dash cam directly to your vehicle’s fuse box. This is the most permanent and capable power method. It supports full-time parking mode, hides all cables inside the car’s trim, and removes any dependence on visible sockets.
Brands like BlackVue and Vantrue build their cameras around hardwire capability. The BlackVue DR970X, for example, includes a dedicated parking mode buffer that records 30 seconds before and after any detected motion — but only when hardwired to a switched power source.
Most hardwire kits include a built-in voltage cutoff that disconnects the camera when the battery drops below 12V, protecting your ability to start the car. This cutoff is essential — do not buy a kit without it.
The honest truth: If you just want basic driving footage, a cigarette lighter adapter is completely fine. If you want to protect your parked car from hit-and-run damage or vandalism, hardwiring is the only reliable option.
How to Install a Dash Cam Yourself: Step-by-Step for Beginners
A basic DIY dash cam installation takes 30 to 45 minutes for a front-only camera using a cigarette lighter or OBD-II adapter. Follow these steps in order and you will end up with a clean, secure result.
- Clean the windshield mounting zone with an alcohol wipe and let it dry for 60 seconds.
- Peel the adhesive backing (or activate the suction cup) and press the mount firmly against the glass for 30 seconds.
- Attach the dash cam to the mount and angle it downward slightly — aim to capture the hood edge and the full road ahead.
- Run the power cable up to the headliner edge using a cable tuck tool, tucking it between the glass seal and headliner fabric.
- Route the cable along the headliner toward the A-pillar (the trim strip beside the windshield).
- Tuck the cable down behind the A-pillar trim toward the dashboard — use a trim pry tool to gently lift the edge of the trim without cracking it.
- Plug the cable into your cigarette lighter or OBD-II port at the base of the dashboard.
- Start the car, confirm the camera powers on, and check the viewing angle on the screen.
- Adjust the mount angle until the camera captures 60% road and 20% sky — correct framing matters for plate and detail capture.
How to Route and Hide Dash Cam Cables Like a Pro
Cable routing is the step most DIY installers skip — and it is the step that separates a clean install from an embarrassing one. The goal is to make the cable completely invisible from inside the cabin.
The standard routing path is: camera → along top windshield seal → across headliner edge → down A-pillar → along door sill or under dashboard → to power source.
Use a flat plastic trim tool (never a metal screwdriver) to gently push the cable up under the rubber windshield seal and behind the A-pillar trim. Most A-pillars have enough space to hide a 3.5mm cable without forcing anything.
If you are routing to a rear cigarette lighter socket or OBD-II port located at the back of the center console, run the cable under the door sill trim along the floor. Door sill trim pops off easily on most vehicles — a single pry tool is all you need.
Buy a $9 cable routing kit that includes a pry tool, cable clips, and a flexible wire guide. It makes hiding cables ten times easier — especially around the A-pillar and headliner edge where the gap is tight.
How to Connect a Dash Cam to Your Fuse Box Safely
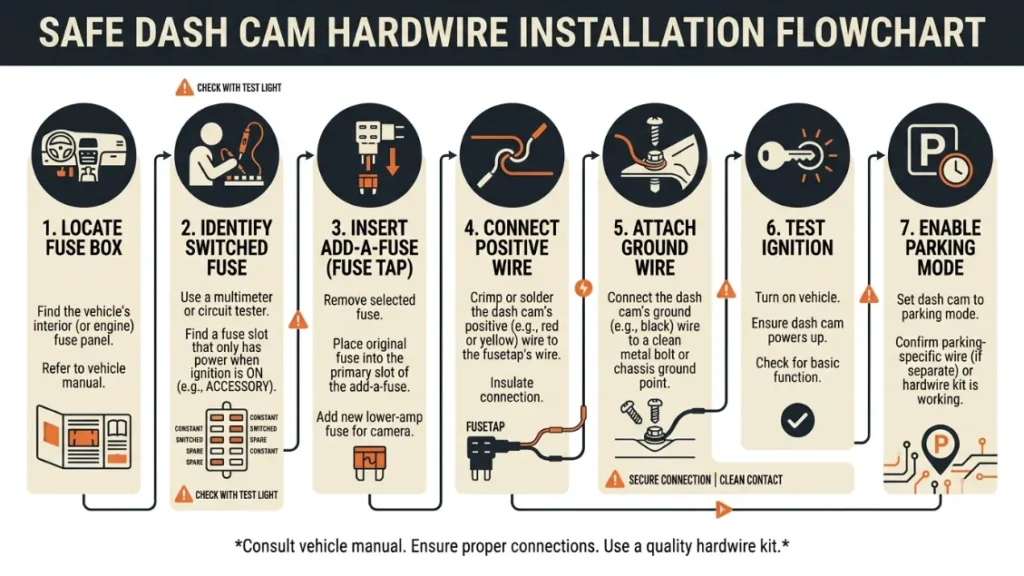
Connecting to the fuse box is the final step in a hardwire install. It sounds intimidating, but the process is straightforward if you follow it carefully. The key is identifying a switched fuse — one that only receives power when the ignition is on — unless you are setting up full parking mode, which requires an always-on fuse plus a voltage cutoff relay.
- Locate your fuse box — usually under the dashboard on the driver’s side or in the engine bay. Check your owner’s manual for the exact location.
- Use a multimeter set to DC voltage. Turn the ignition on and test fuse slots until you find one that shows 12V with ignition on and 0V with ignition off — this is your switched fuse.
- Remove that fuse and insert it into the output slot of your add-a-fuse (load tap adapter).
- Add a new fuse of the same amperage to the input slot of the add-a-fuse.
- Plug the add-a-fuse into the empty fuse slot you just removed the original fuse from.
- Connect the hardwire kit’s positive (red) wire to the add-a-fuse output lead.
- Find a metal bolt or grounding point near the fuse box. Connect the hardwire kit’s negative (black) wire using the ring terminal — this is your ground connection.
- Plug the hardwire kit connector into your dash cam and tuck all wires behind the dash panels neatly.
- Turn the ignition on — the camera should power up automatically. Turn it off — the camera should shut down (or enter parking mode if configured).
Use a fuse rated at 5A or less for your dash cam circuit. Most dash cams draw under 1A. Never tap into a fuse rated above 10A — fuses protect wiring from fire, and a mismatch is a genuine safety hazard. When in doubt, consult a certified auto electrician.
How to Install a Rear Dash Cam Without Losing Your Mind
A rear dash cam installation is the same process as a front install — but with a much longer cable run. Expect it to take 60 to 90 minutes for your first attempt. The cable needs to travel from the front camera all the way to the rear window, which means routing it through or around the entire cabin.
The two main routing paths for the rear cable are along the headliner (across the roof) or along the door sill (along the floor). Headliner routing keeps the cable invisible from inside the car but requires careful tucking across the full roof length. Door sill routing is faster but more visible if the trim does not cover the cable fully.
For hatchbacks and SUVs, you also need to route the cable through the tailgate hinge area. Most vehicles have a rubber grommet where wires pass between the body and tailgate — thread the cable through that grommet carefully to avoid pinching it when the tailgate opens and closes.
Rear cam installation steps: mount the rear camera on the inside of the rear glass, route the cable along the headliner or door sill toward the front, connect it to the front camera’s rear output port, tuck all excess cable behind trim, and test both cameras before closing up the trim panels.
DIY vs Professional Dash Cam Installation: Which One Should You Choose?
The right choice between DIY and professional installation depends on three things: your comfort level with car electronics, the complexity of your setup, and whether you want parking mode enabled.
| Factor | DIY | Professional |
|---|---|---|
| Cost | $0 (your time) | $50–$150 |
| Time | 30–90 min | 1–2 hours (drop-off) |
| Cable Tidiness | Depends on skill | Near-perfect |
| Fuse Box Safety | Risk if inexperienced | Guaranteed correct |
| Parking Mode Setup | Possible with care | Handled fully |
| Multi-Camera Systems | Difficult | Recommended |
DIY makes sense if you are installing a front-only camera with a cigarette lighter or OBD-II adapter. It is simple, reversible, and takes less than an hour with basic patience.
Professional installation makes sense if you want hardwiring with parking mode, a dual or triple-channel system (front, rear, and interior), or if you drive a high-end vehicle where you do not want to risk trim damage.
How Much Does Professional Dash Cam Installation Cost — and Is It Worth It?
Professional dash cam installation in the United States costs between $50 and $150 for a single front camera with full hardwiring and cable management. A dual-channel front-and-rear install costs $100 to $200. Shops like Best Buy’s Geek Squad and independent car audio specialists are the most common providers.
The price includes labor, a clean fuse box connection, proper cable routing behind all trim panels, and in most cases a warranty on the installation work itself. You supply the camera and hardwire kit.
Is it worth it? For a basic single-camera install, no — DIY is straightforward enough. For a hardwired dual-channel system with parking mode in a newer vehicle where trim damage is expensive, yes. A $120 professional install can save you from a $400 trim repair if something goes wrong.
Search for certified auto electricians or car audio specialists in your area. Check reviews specifically for dash cam installation experience — not all car audio shops handle camera wiring with the same care.
Call ahead and ask the shop specifically: “Do you install hardwired dash cams with voltage cutoff protection?” If they do not know what a voltage cutoff is, go elsewhere. A knowledgeable installer will answer that question immediately.
Does Installing a Dash Cam Yourself Void Your Car Warranty?
Installing a dash cam does not automatically void your car warranty in the United States. Under the Magnuson-Moss Warranty Act of 1975, a manufacturer cannot void your warranty simply because you added an aftermarket accessory — unless they can prove the accessory caused a specific problem.
In practical terms, a suction mount on the windshield or a cigarette lighter plug cannot void any warranty. A hardwire connection to the fuse box is slightly more complex — if it causes an electrical fault, that specific fault may not be covered. But it does not void the entire vehicle warranty.
In the UK and EU, similar consumer protection rules apply under the Sale of Goods Act and EU Directive frameworks. According to Which? consumer guidance, fitting an aftermarket accessory does not void warranty unless the accessory directly caused the fault being claimed.
To be safe: if your car is under a dealer warranty and you plan to hardwire a camera, ask the dealer first or use a cigarette lighter adapter until the warranty period ends.
The Most Common Dash Cam Installation Mistakes (and How to Avoid Them)
Most failed dash cam installs come down to the same five mistakes. Here is what to watch for — and how to get it right the first time.
Mistake 1: Mounting too low on the windshield. Low mounting blocks your view and in many countries violates traffic law. Always mount behind the rearview mirror in the top center zone.
Mistake 2: Skipping the windshield cleaning step. Adhesive mounts fail on dusty or oily glass. Wipe the mounting area with isopropyl alcohol and let it dry fully before pressing the mount.
Mistake 3: Not routing the cable at all. A dangling cable is a driving distraction and looks unprofessional. Spend 20 minutes tucking it behind the A-pillar trim — it is always worth it.
Mistake 4: Tapping an always-on fuse for a basic install. Without a voltage cutoff, this drains your battery overnight. Use a switched fuse for cameras that do not need parking mode.
Mistake 5: Forgetting to check the camera angle after mounting. Many drivers mount the camera and never verify the field of view on the screen. A 5-degree tilt downward means you capture the car hood instead of the road ahead. Always check the live preview before finalizing the install.
The single biggest mistake I see is rushing the cable tuck. Fifteen extra minutes of patient cable routing transforms a messy amateur install into something that looks factory-fitted. Take the time. You will thank yourself every time you get in the car.
Conclusion
Installing a dash cam does not have to be complicated. Start with the right power method for your needs — cigarette lighter for simplicity, hardwire kit for parking protection. Mount the camera behind your rearview mirror, route the cable along the A-pillar and headliner, and take 15 extra minutes to tuck it cleanly out of sight.
For a basic front-only install, DIY is completely manageable. For a hardwired dual-camera system with parking mode, a professional installer is worth every dollar of the $100 to $150 cost.
I’m Alex Rahman, and my biggest takeaway from installing and testing dozens of these cameras is this: the install matters as much as the camera itself. A $60 camera installed cleanly and correctly will outperform a $200 camera stuck to the glass with a dangling cord every single time.
For more guidance on choosing the right camera before you install it, the team at RTINGS Dash Cam Reviews provides thorough objective testing data to help you decide.
Frequently Asked Questions

I’m Alex Rahman, a car enthusiast and automotive writer focused on practical solutions, car tools, and real-world driving advice. I share simple and honest content to help everyday drivers make better decisions.