Can I Install My Dash Cam Myself?
Yes, you can install a dash cam yourself. Using a cigarette lighter adapter takes 20 to 30 minutes and needs zero tools. A hardwire install takes 1 to 2 hours and a few basic tools — but gives you a cleaner, cable-free result. Most drivers do this successfully at home with no mechanical experience.
I remember sitting in my car staring at a brand-new Vantrue N4 still in its box. The installer quoted me £85. I thought — there has to be a better way.
I’m Alex Rahman, and I’ve been testing, installing, and reviewing dash cams for years. I’ve done plug-in installs in under 20 minutes. I’ve also spent two hours on my back routing cables behind a headliner. Both are totally doable at home.
The truth is, most people overcomplicate this. You don’t need a mechanic. You don’t need special skills. You just need the right method for your situation — and that’s exactly what this guide covers.
By the end, you’ll know which method suits you, how to do it step by step, and when (rarely) it’s worth paying someone else.
- There are three ways to power a dash cam — adapter, OBD-II port, and hardwire — each with different difficulty levels.
- A cigarette lighter adapter install takes under 30 minutes with no tools at all.
- Hardwiring gives you the cleanest look and enables parking mode — it takes 1 to 2 hours for most drivers.
- Choosing the wrong fuse slot (constant vs ignition-switched) can drain your battery — this guide explains the difference.
- Most people never need to pay a professional for a standard front-camera install.
What Does Installing a Dash Cam Actually Involve?
Installing a dash cam means mounting the camera, connecting it to power, and managing the cable so it’s hidden and tidy. The camera itself mounts to your windshield. The cable runs along your car’s interior trim to a power source — either a socket or your fuse box.
That’s the whole process in one paragraph. The variation comes from how you deliver power to the camera. That one choice determines your difficulty level, your tools, and your final result.
What Comes in the Box and What You Might Still Need
Most dash cams include the camera unit, a windshield mount, a power cable, and a micro SD card (sometimes). Nextbase, Garmin, and Vantrue all include a cigarette lighter adapter cable as standard.
What the box almost never includes:
- A hardwire kit (sold separately, usually £10–£25)
- A trim removal tool for hiding wires
- A fuse tap or add-a-fuse connector
- A rear camera cable (for dual-channel setups)
If you plan to hardwire the camera, buy a hardwire kit made for your specific model. Generic kits sometimes work — but manufacturer kits handle voltage regulation correctly for your camera.
The Three Ways to Power a Dash Cam in Your Car

Here is a simple breakdown before we go deeper:
| Method | Difficulty | Time | Parking Mode | Wire Visibility |
|---|---|---|---|---|
| Cigarette Lighter Adapter | 1/5 — Very Easy | 20–30 min | No | Cable visible unless tucked |
| OBD-II Port | 2/5 — Easy | 20–40 min | Sometimes | Mostly hidden |
| Hardwire Kit (Fuse Box) | 3/5 — Moderate | 1–2 hours | Yes (with constant fuse) | Fully hidden |
How Hard Is It to Install a Dash Cam Yourself?
For most drivers, installing a dash cam is genuinely easy — especially with a cigarette lighter adapter. The hardwire method is moderate, not hard. If you can follow steps and handle a screwdriver, you can do this at home.
I say this not to oversell it, but because the fear of “messing with car electrics” stops people who would sail through the process in an afternoon. The fuse box is not as intimidating as it sounds once you see it.
Difficulty Ratings for Each Installation Method
Cigarette lighter adapter: 1 out of 5. Plug in, mount the camera, tuck the cable. That’s it. Anyone can do this with zero tools in under 30 minutes.
OBD-II port power: 2 out of 5. You need an OBD-II dash cam power adapter (around £15–£30). Plug it into the port under your dashboard, run the cable to the camera. Slightly more cable management — but still no tools required.
Hardwire kit install: 3 out of 5. You’ll tap into your fuse box, route wires behind trim panels, and connect a hardwire kit. It takes patience more than skill. First-timers typically finish in 90 minutes.
Never tap into a fuse that protects airbags, ABS, or engine management systems. Always use a low-current accessory fuse rated 5A–15A. Check your vehicle’s fuse box diagram — it’s usually printed on the inside of the fuse box cover or in your owner’s manual.
Where Should You Mount Your Dash Cam on the Windshield?
Mount your dash cam behind the rearview mirror, centered on the windshield. This gives the camera a clear forward view, keeps it out of your sightline, and places it in the legally permitted zone in most countries.
Placement matters for two reasons: vision safety and legal compliance. A poorly placed camera can obstruct your view and technically make your vehicle non-roadworthy.
Legal Placement Rules You Need to Know First
In the UK, the Highway Code says dash cams must not obstruct the driver’s view. The permitted zone is a 40mm band at the top of the windshield sweep area, or a 10mm band at the bottom.
In the US, rules vary by state. California (Vehicle Code 26708) allows a 5-inch square in the lower left corner or a 7-inch square in the lower right corner of the windshield. Many states follow similar guidelines.
In the EU, placement behind the rearview mirror in the driver’s clear vision zone is standard and accepted across most member states.
Always test your camera’s field of view before permanently mounting it. Power it up with a portable battery, hold it in position, and check the live feed on your phone or screen. Adjust angle before you commit to the adhesive or suction mount.
How to Install a Dash Cam Using a Cigarette Lighter Adapter (Easiest Method)
The cigarette lighter adapter method is the fastest and simplest way to get your dash cam running. You plug one end into your 12V socket, route the cable to the camera, and mount the unit on your windshield. No tools. No fuse box. No wiring skills needed.
This is how I recommend every first-time installer starts. You get the camera working immediately. Once you’re confident you like the position and the camera, you can decide later whether to go for a cleaner hardwire setup.
Step-by-Step: Plug-In Adapter Installation
- Clean the windshield mount area with the alcohol wipe included in your kit. Wait 60 seconds for it to dry.
- Press the suction cup or adhesive mount firmly onto the glass. Hold for 30 seconds.
- Attach the dash cam to the mount and adjust the angle so the lens points straight ahead at horizon level.
- Plug the adapter cable into the camera’s power port.
- Route the cable along the top of the windshield, tucking it into the rubber seal between the glass and the headliner.
- Run the cable down the A-pillar trim on the driver’s side, pressing it into the gap between the trim and the bodywork.
- Plug the adapter end into your 12V cigarette lighter socket.
- Start the car and confirm the camera powers on and records correctly.
That eight-step process takes most people 20 to 25 minutes on their first attempt. The cable tucking step (steps 5 and 6) is the only part that takes any patience.
Use a plastic trim removal tool (around £5 on Amazon) to tuck cables cleanly behind the A-pillar rubber seal. A flat screwdriver works too — but the plastic tool won’t scratch your trim panels.
How to Install a Dash Cam Using an OBD-II Port (The Middle-Ground Option)
The OBD-II method uses your car’s diagnostic port — usually located under the dashboard on the driver’s side — to power the dash cam. It gives you a cleaner install than the cigarette lighter method, without the complexity of fuse box wiring.
You need a dedicated OBD-II dash cam power adapter — not a generic OBD-II reader. Brands like Vantrue and Thinkware sell these for their own cameras. They typically cost £15 to £35.
The OBD-II port is always on in most vehicles, which means some models support limited parking mode through this method. However, this also means it draws power when the engine is off — so check your camera’s voltage cutoff settings before relying on this for overnight parking.
The install process mirrors the adapter method: plug in the OBD-II adapter, run the cable up to the camera, and tuck it into the A-pillar trim. The cable run is shorter because the OBD-II port is closer to the base of the dash — which makes the overall wire management slightly tidier.
The OBD-II method is the best-kept secret in dash cam installation. It’s faster than hardwiring, tidier than a cigarette lighter cable, and most dash cam reviewers never mention it. If your camera brand sells an OBD-II adapter, this is worth serious consideration before you commit to a fuse box install.
How to Hardwire a Dash Cam to Your Fuse Box (Cleanest Result)
Hardwiring connects your dash cam directly to your car’s fuse box using a hardwire kit. This eliminates all visible cables, enables parking mode, and powers the camera automatically whenever you start the car — with no socket or port occupied.
This is the method I use on all my personal vehicles. The first time takes about 90 minutes. By the second or third install, most people do it in under an hour.
What Tools Do You Need to Hardwire a Dash Cam?
- Hardwire kit (manufacturer-specific recommended) — £10 to £25
- Fuse tap / add-a-fuse connector — usually included in hardwire kit
- Multimeter — to test fuse slots (around £10, or borrow one)
- Plastic trim removal tool — to pop A-pillar and headliner trim
- Electrical tape or wire clips — to secure the ground wire
- Your vehicle’s fuse box diagram — check the owner’s manual or inside the fuse box lid
Step-by-Step: Hardwire Installation Guide
- Mount the dash cam on the windshield (same as adapter method — clean, position, attach).
- Route the hardwire kit cable along the headliner, down the A-pillar, and under the dash toward the fuse box. Tuck it behind trim panels using your plastic tool.
- Locate the fuse box — usually under the dashboard on the driver’s side, or in the engine bay. Use your vehicle’s manual to confirm.
- Identify a suitable fuse slot using your fuse box diagram. Choose an ignition-switched slot for standard use, or a constant-power slot for parking mode.
- Test the chosen fuse slot with your multimeter — set to DC voltage. With the ignition on, a live slot reads around 12V. With ignition off, an ignition-switched slot drops to 0V.
- Remove the existing fuse from your chosen slot and insert the fuse tap (add-a-fuse). Place the original fuse in the upper position of the tap, and put the new fuse (usually 5A) in the lower position.
- Connect the red (ACC/positive) wire from the hardwire kit to the fuse tap.
- Connect the black (ground) wire from the hardwire kit to a bare metal grounding point — a bolt on the chassis or a dedicated ground screw under the dash.
- If your hardwire kit has a yellow wire (constant power for parking mode), connect it to a separate constant-power fuse slot.
- Power on the car and confirm the dash cam starts recording. Check that it powers off with the ignition if using an ignition-switched fuse.
How to Choose the Right Fuse Slot — Ignition vs Constant Power
Choosing the wrong fuse slot is the most common hardwire mistake. Ignition-switched fuses only have power when the car is on — perfect for standard operation. Constant-power fuses stay live even when the engine is off — required for parking mode.
Common ignition-switched fuses in most vehicles include: radio, interior lights, heated seats, and the cigarette lighter socket (in most cars). These are safe choices for standard dash cam power.
Common constant-power fuses include: clock, interior courtesy lights (in some vehicles), and alarm systems. Only use these if you have parking mode enabled and voltage cutoff configured — otherwise you risk draining your battery.
For standard use (camera on while driving only): use an ignition-switched fuse, connect only the red and black wires. For parking mode: connect red to ignition-switched, yellow to constant power, black to ground — and set your voltage cutoff in the camera’s settings.
How to Hide Dash Cam Wires So Your Car Looks Factory Clean
Clean cable management is what separates a professional-looking install from a DIY mess hanging across your dashboard. The goal is to route every cable inside the trim panels so no wire is visible from the driver’s seat.
Here is the standard routing path for a front-camera install:
- Along the top of the windshield — tuck the cable into the rubber seal between the glass and headliner.
- Down the A-pillar — use the plastic trim tool to press the cable into the gap between the A-pillar trim and the car’s bodywork. You don’t need to remove the panel — the cable pushes in cleanly.
- Under the dashboard — the cable drops naturally from the base of the A-pillar toward the fuse box or socket area.
This three-stage route hides the cable completely in most vehicles. The A-pillar trim in most modern cars has enough of a gap to accept a 3mm to 4mm cable without any force. Garmin’s Dash Cam Mini 2 is popular partly because its ultra-thin cable is genuinely invisible once tucked into this channel.
Leave a small loop of slack cable near the camera mount. This prevents the cable from pulling taut over time as the suction mount shifts slightly with temperature changes — which can eventually drag the camera out of position.
How to Install a Rear Dash Cam Yourself
Yes, you can install a rear dash cam yourself — it takes an additional 30 to 60 minutes on top of your front camera install. The rear camera connects to the front unit via a long cable that runs around the interior of your car’s cabin.
Dual-channel systems from brands like BlackVue, Nextbase, and Vantrue come with a rear camera cable typically 6 to 7 metres long — enough for most passenger cars and SUVs.
How to Route the Rear Camera Cable Through the Headliner
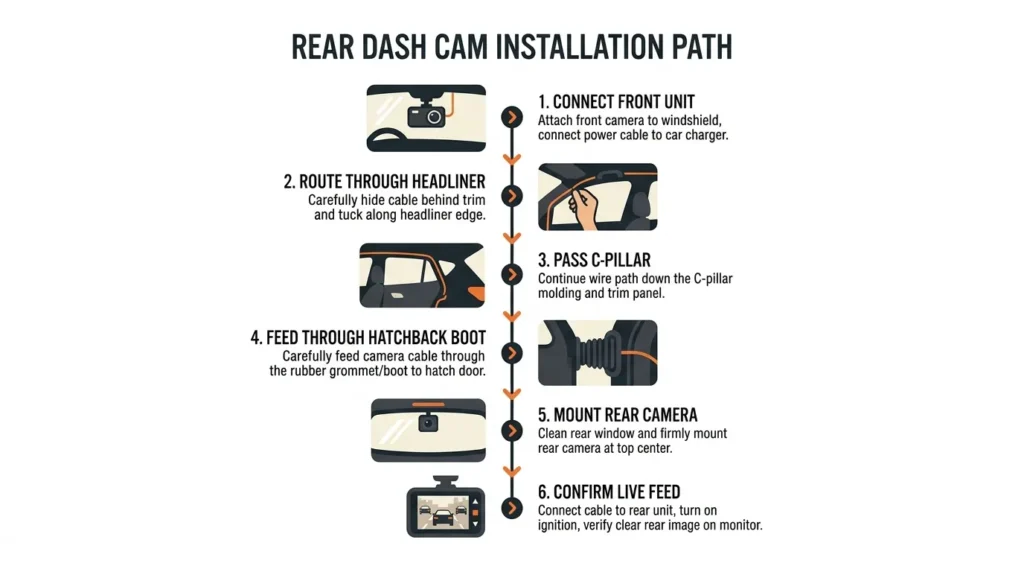
- Connect one end of the rear camera cable to the front dash cam unit.
- Run the cable along the top of the windshield (same channel as the power cable), tucking it into the headliner seal.
- Continue routing along the headliner across the roof of the car — the cable tucks into the gap between the headliner and the roof panel. Use your plastic trim tool.
- At the rear of the cabin, bring the cable down the C-pillar trim (rear corner pillar) on either side.
- For a hatchback or SUV with a rear wiper: route the cable through the rubber boot that covers the wiring between the car body and the tailgate. Feed the cable through this boot alongside existing wires.
- For a saloon (sedan): mount the rear camera on the inside of the rear windshield, routing the cable down the C-pillar to the parcel shelf, then up to the glass.
- Mount the rear camera on the rear glass, connect the cable, and confirm the rear feed appears on the front unit display.
On hatchbacks and SUVs, the rubber boot between the car body and tailgate contains multiple wires. Push your rear camera cable through gently — never force it. If the boot is too tight, you can replace it with a slightly longer aftermarket boot, or use an external cable conduit along the door seal instead.
Does Hardwiring a Dash Cam Drain Your Car Battery?
A hardwired dash cam on an ignition-switched fuse does not drain your battery at all — it only draws power when the engine is running. The risk comes only when using parking mode with a constant-power connection, which draws power continuously while the car is parked.
Most modern dash cams in parking mode draw around 100mA to 200mA. A standard 60Ah car battery can theoretically power this for 300 to 600 hours — but in practice, battery health, age, and ambient temperature mean the safe window is much shorter.
How to Set the Voltage Cutoff to Protect Your Battery
Every parking-mode-capable dash cam has a voltage cutoff setting in its menu. This tells the camera to stop recording and shut off if battery voltage drops below a set threshold — typically 11.6V to 12.0V — to ensure you can still start the car.
Here is how to configure it correctly:
- Access your camera’s settings menu (usually via the touchscreen or companion app).
- Find “Parking Mode” or “Battery Protection” settings.
- Set the voltage cutoff to 11.8V as a safe starting point for most vehicles.
- If your battery is older or your car sits for more than 12 hours regularly, raise the cutoff to 12.0V.
- You can also set a time limit — for example, parking mode cuts off after 12 hours regardless of voltage.
BlackVue’s parking mode system and Vantrue’s energy management both handle this well out of the box. Nextbase’s hardwire kit also includes a voltage monitor built into the kit itself for older camera models. You can find more detail on battery safety in vehicle electronics at the AA’s car battery guide.
Which Dash Cam Installation Method Is Right for You?
The right method depends on three things: whether you want parking mode, how much you care about visible cables, and how confident you feel working near your fuse box. Here is a clear decision framework:
| Your Situation | Best Method | Why |
|---|---|---|
| First-time install, just want it working fast | Cigarette lighter adapter | Zero risk, zero tools, works immediately |
| Want cleaner look without touching fuse box | OBD-II port adapter | Tidier cable run, no fuse box required |
| Want completely hidden wires and parking mode | Hardwire kit to fuse box | Professional finish, enables full feature set |
| Installing a dual front-and-rear system | Hardwire kit | Two cameras need reliable, permanent power |
| Lease car or rental — no permanent changes allowed | Cigarette lighter adapter | Completely reversible, no marks or modifications |
When Should You Pay a Professional to Install Your Dash Cam?
Pay a professional in a small number of specific situations — not as a default. Most standard dash cam installs are genuinely within the reach of any driver with patience and an hour to spare.
Consider professional installation if:
- Your vehicle has a complex or non-standard fuse box — some European luxury vehicles like BMW and Mercedes route electronics differently and require specialist knowledge.
- You are installing a 3-channel or 4-channel system (front, rear, and interior cameras) with multiple hardwire connections.
- Your car has a heated windshield — the metallic coating in some heated screens blocks GPS signal and affects camera performance. A professional can advise on alternative mounting positions.
- You want a mirror-replacement dash cam (like the Nextbase 522GW mirror mount) installed — these require removal of the original rearview mirror and specific bracket fitting.
- You simply don’t want to do it and would rather spend the £50 to £100 to have it done right the first time.
That last point is completely valid. There is no shame in paying for a professional install. But know that the most common scenario — one front camera, hardwired to a simple fuse box — is something most people can handle at home. The Which? dash cam buyer’s guide consistently confirms that installation complexity is the biggest overestimated barrier for new buyers.
The average professional dash cam install costs £50 to £150 in the UK and $60 to $120 in the US. For a front-camera-only install using a cigarette lighter adapter, that cost is completely avoidable. Save the professional fee for situations where it genuinely adds value — not for a 20-minute plug-in job.
Conclusion
So — can you install a dash cam yourself? Absolutely yes. And now you know exactly how.
If you want the fastest result with zero fuss, the cigarette lighter adapter method gets you up and running in 20 minutes with no tools. If you want a factory-clean finish and parking mode capability, the hardwire kit method is worth the extra hour — and it’s far less intimidating than it sounds.
I’m Alex Rahman, and after years of testing these setups on my own vehicles and recommending them to readers, the consistent truth is this: the hardest part of installing a dash cam is deciding to start. Once you do, it almost always goes smoother than expected.
Pick your method, gather your tools, and give yourself an afternoon. Your future self — with clean footage of that parking lot incident — will be glad you did. For more in-depth guidance on choosing the right camera before you install it, the team at Dash Cam Talk maintains one of the most detailed enthusiast resources available.
Frequently Asked Questions

I’m Alex Rahman, a car enthusiast and automotive writer focused on practical solutions, car tools, and real-world driving advice. I share simple and honest content to help everyday drivers make better decisions.