Jump Starter Fails? Fix It Fast (Step-by-Step)
If your jump starter fails, start by checking three things: the charge level, the clamp connections, and the cable condition. Most failures trace back to a drained internal battery, a loose or corroded connection, or a unit left unused for months. Recharge fully, clean the terminals, and reconnect securely before assuming the device is broken.
I remember standing in a dark parking lot at 10 PM, dead car battery, jump starter in hand — and the jump starter itself refusing to turn on. That sinking feeling is something no driver should face unprepared. I’m Alex Rahman, and after years of reviewing automotive tools and testing portable power devices, I’ve learned exactly why jump starters fail and, more importantly, how to fix them fast.
A portable jump starter is one of the most critical emergency tools a driver can own. But like every battery-powered device, it can fail when you least expect it. The good news is that most failures are fixable in under ten minutes with the right knowledge. This guide walks you through every cause, every fix, and every decision point — so you’re never stranded again.
- Most jump starter failures come from a depleted internal battery — recharge every 3 months even when unused.
- Corroded or loose clamp connections prevent power transfer and cause up to 30% of failed jump attempts.
- Lithium jump starters can trigger BMS lockout when stored too long — a simple reset procedure restores most units.
- Cold weather reduces battery output significantly — warm the device before use in temperatures below 32°F (0°C).
- If the jump starter works but your car won’t start, the problem may be your alternator, starter motor, or blown fuse — not the jump starter.
Why Does a Jump Starter Fail in the First Place?
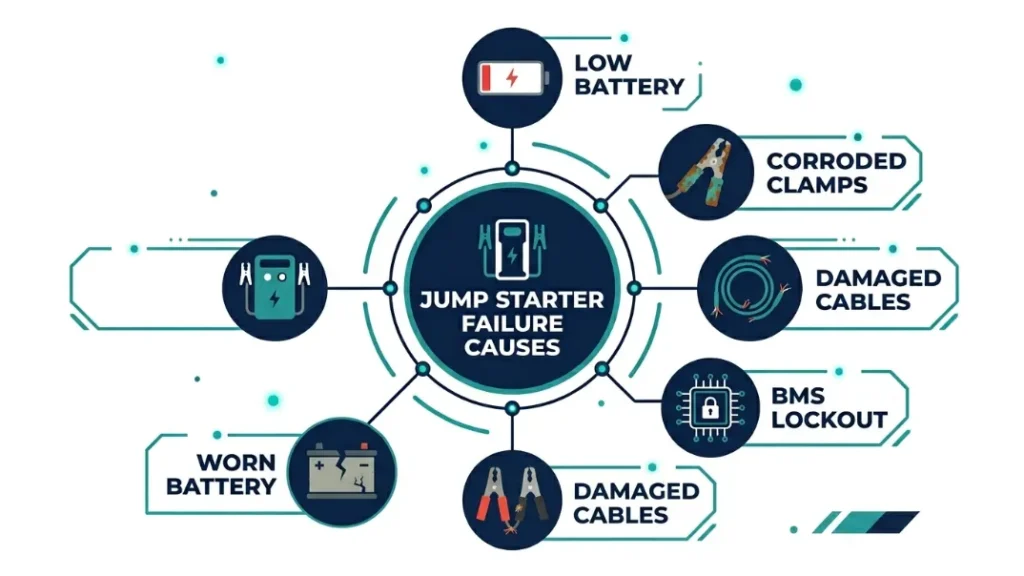
A jump starter fails for one of five main reasons: low or dead internal charge, corroded or disconnected clamps, damaged cables, a triggered safety protection circuit, or a worn-out internal battery. Understanding which one applies to your device determines how to fix it — and whether a fix is even worth attempting.
Most portable jump starters use either lithium-ion or sealed lead-acid (SLA) batteries. Each type degrades differently and fails in different ways. Lithium units from brands like NOCO, Anker, and Tacklife can trigger a Battery Management System (BMS) lockout when cells drop below a critical voltage. SLA units from EverStart and similar brands tend to sulfate when left uncharged, reducing their ability to deliver peak current.
The average jump starter lasts between 3 and 5 years with proper care. Without regular charging and proper storage, that lifespan can drop to under 18 months. Knowing this helps you decide when to repair and when to replace.
Step 1: Check the Charge Level First
The single most common reason a jump starter fails is that its internal battery is depleted. Many drivers store their device in a glove box or trunk and never charge it between uses. Lithium batteries self-discharge over time, and SLA batteries lose charge even faster — especially in hot environments.
Most jump starters need at least 75% charge to successfully start a vehicle. If your device has been sitting unused for 2 months or more, recharge it fully before troubleshooting anything else. Always use the original charging cable and wall adapter. Third-party chargers may supply the wrong voltage and result in an incomplete charge or permanent battery damage.
Set a calendar reminder to recharge your jump starter every 90 days. This one habit prevents 80% of jump starter failures before they happen.
After a full recharge, check the LED indicator. Most devices show green for full charge and red or flashing for low charge. If the device will not charge at all, move to Step 2 to check the charger and cable connections.
Step 2: Inspect the Clamp Connections
Loose or corroded clamp connections cause roughly 30% of failed jump attempts. A poor connection prevents power from transferring from the jump starter to your car battery, no matter how fully charged your device is. Before blaming the jump starter itself, always inspect the physical connection first.
Check the clamps for green or white corrosion on the metal contacts. This buildup increases electrical resistance and blocks current flow. Clean corroded terminals using a paste made from baking soda and water, applied with an old toothbrush. Rinse with clean water and dry completely before reconnecting.
- Disconnect the clamps from the battery terminals completely.
- Mix one tablespoon of baking soda with one cup of water.
- Apply the paste to corroded areas using a toothbrush.
- Scrub gently until the green or white buildup disappears.
- Rinse with clean water and dry with a cloth before reconnecting.
Also check the connection between the clamps and the jump starter cable. Wiggle the clamps while watching the indicator lights. If the lights flicker or change, the cable connection is loose or internally damaged. A damaged cable assembly needs replacement — not a repair — to ensure safe operation.
Step 3: Check for Reverse Polarity Errors
Connecting the clamps in the wrong order triggers the jump starter’s reverse polarity protection and shuts the device down. This is a safety feature — not a malfunction.
The positive red clamp must connect to the positive terminal of your car battery, and the negative black clamp connects to an unpainted metal ground point on the vehicle chassis.
Most modern jump starters from NOCO, Schumacher, and similar brands use UltraSafe technology that automatically detects reverse polarity and sounds a warning instead of allowing current to flow. If you see a red warning light or hear an alert tone, disconnect immediately and check your connections before trying again.
Never force a connection when a warning light is active. Bypassing reverse polarity protection can cause serious electrical damage to your vehicle’s ECU, fuse box, and onboard electronics — repairs that can cost thousands of dollars.
Step 4: Identify Overload or Overheating Shutdown
Jump starters contain overload protection circuits that shut the device down when it draws more current than it can safely deliver. This happens most often when attempting to jump-start a large diesel engine, a deeply discharged battery, or a vehicle with a short circuit in its electrical system.
If your jump starter shut down mid-attempt, unplug it from the vehicle and let it cool for 5 to 10 minutes. This reset allows the thermal protection to clear. Do not attempt another jump start immediately.
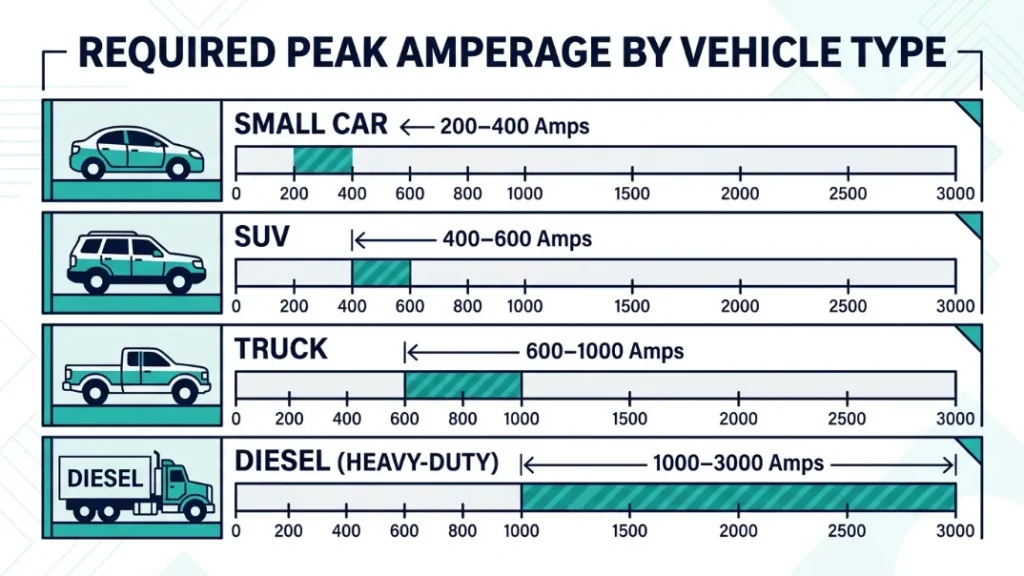
Check the device’s peak amperage rating and compare it to your vehicle’s engine size. Smaller vehicles typically need 250 to 300 amps, while larger engines or cold-weather starts may require 400 to 600 amps or more.
Small cars and motorcycles need 200–400 peak amps. Mid-size sedans and SUVs need 400–600 amps. Full-size trucks and large SUVs need 600–1000 amps. Diesel engines and commercial vehicles often require 1000–3000 amps. Always match your jump starter’s peak amp rating to your vehicle’s requirements before purchase.
Step 5: Reset a Lithium BMS Lockout
Lithium jump starters from brands like NOCO and Tacklife can enter a Battery Management System (BMS) lockout when internal cells drop below approximately 2.7 volts per cell. This is a safety mechanism that looks exactly like total device failure — the unit appears completely dead with no lights, no power, and no response.
According to field data, a BMS reset successfully revives lithium jump starters about 70% of the time. The process requires applying 12V from an external source to wake the internal management system back up.
- Locate the battery pack inside the jump starter (usually two spade terminals).
- Connect 12V from a working car battery using short jumper leads for 2 minutes.
- Reinstall the battery pack and attempt normal charging via the original charger.
- Wait 15 minutes and check the indicator lights for a charge response.
- If lights remain inactive, internal cell damage has occurred and professional replacement is required.
If the BMS reset fails, do not attempt to open the unit unless you have electronics repair experience. Opening a lithium jump starter can expose swollen cells that may vent hot gas. NOCO’s support team and most major manufacturers offer warranty exchanges that are faster and safer than DIY repair.
Step 6: Test the Jump Starter on Another Vehicle
Before concluding that your jump starter is defective, test it on a different vehicle. Sometimes the issue is not the jump starter — it is the car battery itself. A battery that is severely sulfated, deeply discharged, or internally damaged may not accept a charge from any source.
If your jump starter successfully starts a second vehicle, the original vehicle’s battery is the problem. A battery that has discharged below 8 volts may need a dedicated battery charger over several hours rather than an instant jump start.
For a more definitive test, use a multimeter to measure voltage directly across your car battery terminals. A healthy resting voltage reads between 12.4 and 12.7 volts. A reading below 11.8 volts indicates a battery that needs full reconditioning or replacement.
Always test your jump starter on a healthy vehicle every 6 months to confirm it still delivers adequate power under load. A device that charges fully but drops below 10 volts under load has a degraded battery and needs replacement.
What If the Jump Starter Works But the Car Still Won’t Start?
A working jump starter that cannot start your vehicle points to a problem in the vehicle itself, not the jump starter. Several mechanical and electrical faults can prevent a car from starting even when the battery receives adequate power.
The most common vehicle-side causes include a failing alternator, a bad starter motor, a blown fuse or relay, and an anti-theft system lockout. Each produces different symptoms that help identify the root cause.
| Symptom | Likely Cause | Next Step |
|---|---|---|
| Rapid clicking sound | Low power or bad ground connection | Check cable ground and recharge jump starter |
| Single heavy click, no crank | Failing starter motor | Tap starter gently, call mechanic if no change |
| No sound, no crank, dash lights on | Blown fuse, bad relay, or anti-theft lockout | Check fuse box and try spare key |
| Car starts but dies within seconds | Failing alternator not recharging battery | Test alternator voltage output, seek mechanic |
| No response in extreme cold | Cold-reduced battery output (jump starter or car) | Warm both batteries, extend connection time |
Cold weather deserves special attention. Below 32°F (0°C), lithium batteries lose up to 50% of their output capacity. Keep your jump starter inside the vehicle cabin rather than in the trunk during winter months. If an outdoor start fails in cold weather, bring the device indoors for 15 minutes and try again before assuming it is broken.
When to Repair vs. When to Replace Your Jump Starter
Not every failed jump starter is worth fixing. The decision depends on the type of failure, the age of the device, and the cost of repair relative to a new unit. Repairs make financial sense for connection problems, cable damage, and BMS resets. Replacement makes more sense when the internal battery has degraded beyond recovery.
Lithium-ion battery degradation is permanent. Once cells can no longer hold a charge or deliver adequate current under load, no amount of reconditioning will restore full performance. A replacement lithium battery pack for most branded jump starters costs between $20 and $45 — often more than half the cost of a new budget-tier unit. Factor in your time and the risk of improper installation before committing to an internal repair.
A good rule of thumb: if your jump starter is over 3 years old and fails to deliver at least 11.5 volts under a 12V load test, replacement is the smarter investment. A reliable device ready at the critical moment is worth more than a repaired one that might fail again.
If your unit is still under warranty, contact the manufacturer before attempting any repair. NOCO, Anker, and most major brands honor warranty claims with direct replacements. Opening the device typically voids coverage immediately.
NOCO Boost GB40: 1000A UltraSafe Jump Starter – 12V Lithium Battery Booster Pack, Portable Jump Box, Power Bank & Jumper Cables – for 6.0L Gas and 3.0L Diesel Engines
This is the jump starter I recommend most to drivers who want a reliable, spark-proof device with reverse polarity protection built in — so the problems in this article simply do not apply when you use it correctly from day one.
How to Prevent Jump Starter Failure Before It Happens
Prevention is far simpler than troubleshooting. Most jump starter failures are completely avoidable with three basic habits: regular recharging, proper storage, and periodic load testing. Implementing these habits takes about 10 minutes per quarter and virtually eliminates the risk of your device failing during an emergency.
Recharge every 90 days for SLA units and every 6 months for lithium units. Store the device at temperatures between 40°F and 80°F (4°C to 27°C). Trunk heat above 113°F (45°C) doubles the self-discharge rate of lithium cells and accelerates degradation. A cool, dry location inside your home is always better than the glove box or trunk during summer.
Perform a load test every 6 months using a 12V halogen bulb connected to the clamps. A healthy jump starter holds above 11.5 volts for at least 10 seconds under this load. A reading below 10 volts signals it is time for a new unit — before you need it on the road.
Keep the clamps clean and the cables coiled properly. Never yank the cable by the wires — always grip the clamp housing when disconnecting. Inspect the cable insulation every few months for cracks or fraying, especially at the point where the cable meets the clamp housing. This junction experiences the most mechanical stress during use and is the first area to develop faults.
According to Car and Driver’s battery maintenance guide, a jump starter stored properly and recharged on schedule can reliably perform for 4 to 5 years before performance decline becomes significant. A device stored in a hot trunk and never recharged may fail within 12 months of purchase.
Alternative Options When Your Jump Starter Fails Completely
When your jump starter fails in the field and no backup device is available, you still have options. The most reliable alternative is a traditional jump start using a second vehicle and jumper cables. Position both vehicles so the cables reach between the batteries, connect positive to positive, then negative to a ground point on the dead vehicle’s chassis — never to the dead battery’s negative terminal.
If no second vehicle is available, call your roadside assistance provider. AAA (American Automobile Association) dispatches service vehicles equipped with commercial-grade battery boosters that can start most vehicles in minutes. Many auto insurance policies and credit card benefits also include roadside assistance at no additional cost — worth checking before you need it.
Never attempt to jump-start a cracked, leaking, or frozen car battery. A damaged battery can produce hydrogen gas that ignites with a single spark, causing an explosion. If you see white crust, cracks, or swelling on your car battery case, call a professional — do not attempt any jump-start procedure.
Frequently Asked Questions
Why is my jump starter fully charged but not starting my car?
A fully charged jump starter that cannot start your car usually points to a vehicle problem, not a device problem. The most common causes are a deeply discharged or sulfated car battery, a failing starter motor, a blown fuse, or a disconnected ground. Test the jump starter on another vehicle to confirm it works, then diagnose the vehicle separately.
How often should I charge my portable jump starter?
Charge lithium jump starters every 6 months during storage. Charge sealed lead-acid (SLA) units every 90 days. Leaving either type uncharged for extended periods causes irreversible battery degradation. Regular charging is the single most effective way to extend the life of any jump starter.
Can a jump starter be repaired at home?
Simple repairs like cleaning corroded clamps, replacing a damaged cable assembly, or resetting a BMS lockout can be done safely at home. Internal battery replacement and circuit board repair require technical knowledge and risk voiding your warranty. For devices under 1 year old, contact the manufacturer for a warranty exchange instead.
Why does my jump starter turn on but not start the car?
A jump starter that powers on but fails to start a car usually lacks adequate peak amperage for that vehicle, has degraded cells that cannot deliver current under load, or has a poor clamp connection preventing power transfer. Check that the device’s rated amps match your engine size, and perform a load test using a 12V bulb to verify output under real demand.
How do I know when to replace my jump starter?
Replace your jump starter when it is over 3 years old, fails to hold a charge longer than a few weeks, or drops below 10 volts under a 12V load test. Also replace immediately if the casing is cracked, the battery is swollen, or the device emits a burning smell — these indicate internal damage that makes further use unsafe.
Does cold weather affect portable jump starters?
Yes — lithium batteries lose up to 50% of their output in temperatures below 32°F (0°C). This means a jump starter that works perfectly in summer may deliver insufficient power in winter. Store the device inside the vehicle cabin during cold months, and warm it under your jacket for 10 minutes before use if temperatures are near freezing.
What should I do immediately if my jump starter starts smoking?
Disconnect the jump starter from the vehicle immediately and move it to a well-ventilated outdoor area away from flammable materials. Do not use it again until it has cooled completely and you have inspected it for physical damage. If the casing is melted, cracked, or warped, dispose of the unit at a certified battery recycling center — never in household trash.
Conclusion
A jump starter failure does not have to leave you stranded. In most cases, the fix is straightforward — recharge the device, clean the connections, correct the clamp polarity, or reset a triggered protection circuit. I’ve walked through hundreds of these situations, and the pattern is almost always the same: the problem is simpler than it appears.
The most important action you can take today is to check your jump starter’s charge level and schedule a recharge if it has been sitting for more than 90 days.
That one habit prevents the majority of roadside failures. If your device is old, degraded, or beyond repair, invest in a quality lithium unit with built-in protections before you need it — not after.

I’m Alex Rahman, a car enthusiast and automotive writer focused on practical solutions, car tools, and real-world driving advice. I share simple and honest content to help everyday drivers make better decisions.