Do I Need to Hide My Dash Cam Wires and How Do You Do It Cleanly?
You do not have to hide your dash cam wires by law, but you absolutely should. Loose cables cause driver distraction, attract thieves, and look unprofessional. Most drivers route their cable behind the A-pillar trim and tuck it along the headliner for a clean, invisible result in under 30 minutes.
The first time I installed a dash cam, I just plugged the cable into the cigarette lighter and let it dangle across the windshield. It worked. But every time I drove, that cable swung around, caught my eye, and looked like a mess. I’m Alex Rahman — I’ve tested and installed over 40 dash cams across a range of vehicles — and sloppy wiring is the single most common mistake new dash cam owners make.
Here is the honest truth. No law requires you to hide your dash cam wires. But loose cables dangling across your dashboard create real problems — distraction, theft risk, and an install that screams “temporary.” A properly routed cable takes 20 to 40 minutes and costs nothing extra if you already own the right tools.
In this guide I’ll walk you through three methods — from the simplest five-minute fix to a full professional hardwire install. By the end, you’ll know exactly which approach fits your skill level and your car.
- Hiding dash cam wires is not legally required but is strongly recommended for safety and security.
- Three methods exist — adhesive clips, A-pillar routing, and hardwire via fuse box — each with different difficulty levels.
- A-pillar routing gives the cleanest DIY result with no permanent changes to your vehicle.
- A hardwire kit connects to your fuse box and is required if you want parking mode to work.
- Most cars allow full wire hiding in under 40 minutes with basic tools and no professional help.
Why Should You Hide Your Dash Cam Wires in the First Place?
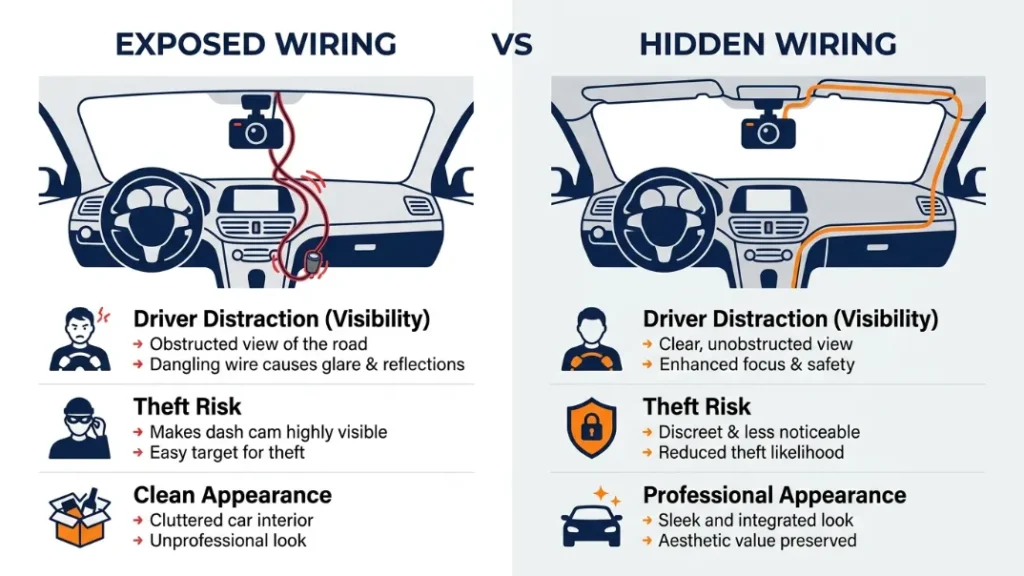
Hiding dash cam wires removes a genuine safety hazard, deters opportunistic theft, and gives your car a cleaner, more professional appearance. A dangling cable is not a minor inconvenience — it is an active distraction and a visual signal that valuables are inside your vehicle.
Do Loose Wires Cause Driver Distraction or Safety Issues?
Yes. Any object that moves in your peripheral vision pulls your attention away from the road. A swinging cable falls squarely into that category. The National Highway Traffic Safety Administration consistently identifies visual distraction as a leading cause of accidents — and even a brief eye flick toward a dangling wire at 60 mph means your vehicle travels over 80 feet without your full attention.
Beyond distraction, a loose cable can physically interfere with your steering wheel or gear stick if it falls at the wrong moment. This is rare, but it has happened. It is also worth noting that in some jurisdictions, anything obstructing your field of view through the windshield can result in a roadworthiness issue during a vehicle inspection.
Never route your dash cam cable across the driver’s field of vision or anywhere near the steering column. Even a well-meaning loose cable can become a hazard in a sudden braking situation.
Can Visible Wires Make Your Dash Cam a Target for Theft?
Absolutely. A cable trailing from your windshield is a neon sign that says “there is an expensive device in this car.” Smash-and-grab theft of dash cams is a documented problem in urban areas across the UK and US. A 2022 survey by Halfords found that dash cam theft spiked when the camera itself was left visible — and a visible cable is almost as telling as the camera.
A hidden cable means no cable to spot. If a thief cannot see any sign of a dash cam from outside, they are far less likely to target your vehicle. This is especially true for parking mode setups where the camera records overnight without you nearby.
What Are the Three Main Methods for Hiding Dash Cam Wires?
Three approaches cover almost every driver’s situation: adhesive cable clips for the easiest quick fix, A-pillar and headliner routing for a clean DIY install, and a hardwire kit through the fuse box for a fully professional result. Each has a different difficulty level, cost, and permanence.
| Method | Difficulty | Cost | Time | Result |
|---|---|---|---|---|
| Adhesive Cable Clips | Easy | £3–£8 / $4–$10 | 5–10 minutes | Tidy but visible |
| A-Pillar / Headliner Routing | Moderate | £0–£15 / $0–$18 | 20–40 minutes | Clean, near-invisible |
| Hardwire Kit via Fuse Box | Advanced | £15–£35 / $18–$45 | 45–90 minutes | Fully invisible + parking mode |
Method 1 — Adhesive Cable Clips (Easiest, No Tools Needed)
Adhesive cable clips are small plastic holders that stick to your headliner or A-pillar and grip the cable in place. They do not hide the wire completely, but they tame it into a controlled path along the edge of the windshield. This is the right method if you want a quick tidy result with zero commitment.
Brands like 3M and Command sell cable management clips that leave no permanent marks on your car interior. You press the clip against the headliner near the windshield edge, route the cable through, and repeat every 15 to 20 centimetres down toward the dashboard. The cable stays flat against the trim rather than swinging freely.
Clean the headliner surface with an alcohol wipe before applying adhesive clips. Dust and oils cause the adhesive to fail within days, especially in a hot car interior.
Method 2 — A-Pillar and Headliner Routing (Cleanest DIY Look)
This is the method I recommend for most drivers. You gently pull back the rubber door seal and A-pillar trim — the vertical panel between the windshield and front door — and tuck the cable behind it. The wire travels down inside the trim, hidden from view, and emerges near the footwell where it can run to the cigarette lighter or OBD-II port.
No permanent modification is needed. The A-pillar trim in almost every modern car clicks into place with friction clips and can be removed and refitted without tools or damage. The result looks exactly like a factory installation.
Method 3 — Hardwire Kit via Fuse Box (Most Professional Result)
A hardwire kit replaces the cigarette lighter plug entirely. The cable connects directly to your car’s fuse box and powers the dash cam from a constant or switched live fuse. This eliminates any external cable at all — the power comes invisibly through the car’s own wiring loom. It also enables parking mode, because the camera draws power even when the ignition is off.
Brands like Nextbase (whose 622GW is one of the UK’s best-selling dash cams), Viofo, and BlackVue all sell dedicated hardwire kits matched to their cameras. Expect to pay between £15 and £35 for a quality kit, and budget about 60 to 90 minutes for your first install.
What Tools Do You Need to Hide Dash Cam Wires Properly?
For the A-pillar method, you need a plastic trim pry tool, a cable routing stick or flat screwdriver wrapped in tape, and optionally a set of adhesive cable clips. For a hardwire install, you additionally need a fuse tester, a multimeter, a fuse tap or Posi-Tap connector, and a basic electrical connector kit.
- Plastic trim pry tool — removes door seals and A-pillar without scratching trim
- Cable routing stick / fish wire — feeds the cable behind tight panels
- Adhesive cable clips — optional for securing cable inside hidden channels
- Fuse tester / multimeter — identifies the correct fuse for hardwiring
- Fuse tap or Posi-Tap connector — safely adds your dash cam to an existing fuse circuit
- Mini blade fuse (correct amperage) — usually 5A or 10A depending on your dash cam
A full plastic pry tool kit costs under £10 on Amazon. If you are only doing the A-pillar method, the pry tool alone is all you really need.
Wrap a flat-bladed screwdriver with masking tape if you don’t own a plastic pry tool. This prevents scratches on your trim while still giving you enough leverage to pop the A-pillar away from the body.
How Do You Route Dash Cam Wires Behind the A-Pillar Step by Step?
Routing your dash cam cable behind the A-pillar takes about 20 to 40 minutes and leaves no trace in your car. The steps are the same across the vast majority of modern vehicles.
- Mount your dash cam at the top centre or top driver’s side of the windshield, close to the rearview mirror mount.
- Run the cable along the top edge of the windshield toward the A-pillar side of the car.
- Gently peel back the rubber door seal along the top of the door frame — it pulls free with steady pressure and no tools.
- Use your plastic pry tool to carefully pull the A-pillar trim panel away from the body, working from top to bottom. It clips into place and comes free with gentle outward pressure.
- Tuck the dash cam cable into the gap between the A-pillar trim and the car body, using a cable routing stick to push it fully into the channel.
- Press the A-pillar trim firmly back into its clips. Press the rubber door seal back into place along the door frame.
- Route the remaining cable down the door seal or along the base of the windshield to the dashboard, tucking it under the edge of the dashboard trim if possible.
- Plug the cable into your cigarette lighter socket or OBD-II port and test that the camera powers on correctly.
The OBD-II port — the diagnostic socket usually found under the left side of the dashboard — is a convenient hidden power source that many drivers overlook. Small OBD-II power adapters (available for under £10) convert this port into a USB or hardwire power source. Your cable travels from the camera, behind the A-pillar, down into the footwell, and plugs directly into the OBD-II port. No cigarette lighter cable dangling in the centre console at all.
How Do You Hardwire a Dash Cam for the Cleanest Cable-Free Look?
Hardwiring a dash cam means connecting it directly to your vehicle’s fuse box so it draws power invisibly through the car’s existing electrical system. This eliminates every external cable and enables parking mode recording — the camera runs 24 hours a day without you ever needing to plug anything in.
What Is a Hardwire Kit and Why Does It Enable Parking Mode?
A hardwire kit is a short cable with a fuse-tap connector on one end and a mini-USB or USB-C connector on the other. It taps into two fuses in your car’s fuse box — one constant live (always on) and one switched live (on only with the ignition). This dual connection lets the kit detect whether your engine is running. When you turn off the ignition, the camera switches to low-power parking mode and continues to record any motion or impact, drawing only from the constant live fuse.
Without hardwiring, parking mode is not possible — because the cigarette lighter socket loses power when you remove the key in most vehicles. BlackVue’s DR970X and Viofo’s A229 Plus are two popular cameras that fully unlock parking mode only through a proper hardwire connection.
Which Fuse Should You Use When Hardwiring a Dash Cam?
Use a switched live fuse for the ignition-sense wire (something like the radio, heated seats, or interior lights fuse) and a constant live fuse for the always-on wire (something like the clock, interior light, or OBDII fuse). Always use a fuse tap rated at 5A for the dash cam circuit — never splice directly into an existing fuse without adding your own protection.
Always use a multimeter or fuse tester to confirm which fuses are switched and which are constant before connecting anything. Connecting to the wrong fuse can drain your car battery overnight or blow fuses for important systems.
If you are uncomfortable working near your car’s electrics, retailers like BlackboxMyCar offer detailed hardwire installation guides specific to individual dash cam models. Many independent car audio shops will also hardwire a dash cam for £30 to £60, which is excellent value for the peace of mind.
Which Dash Cam Wire Hiding Method Is Right for You?
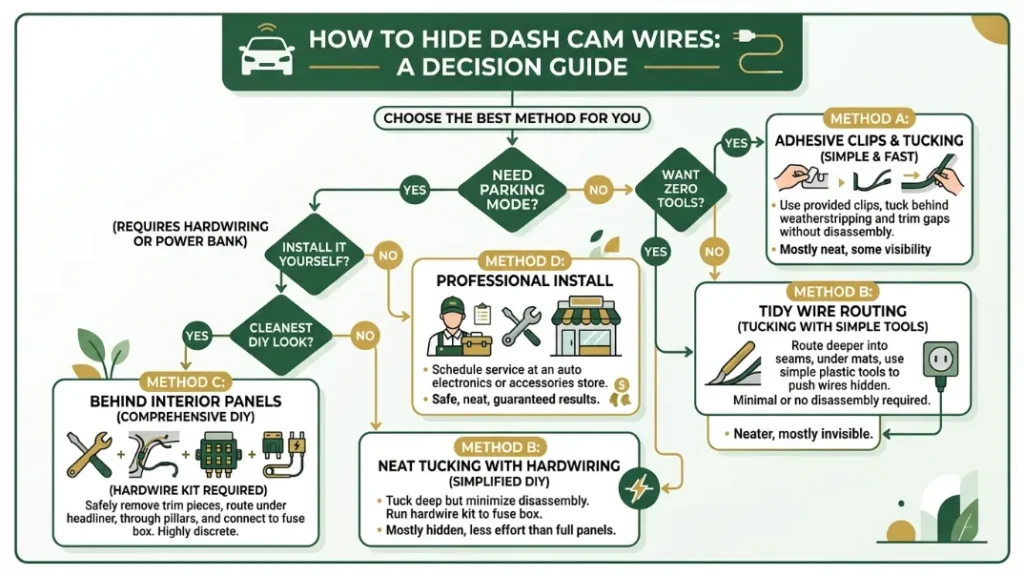
Choose your method based on how much time you want to spend, whether you want parking mode, and how comfortable you are working with your car’s interior trim.
Quick decision guide: If you want a tidy result in under 10 minutes with zero tools — use adhesive clips. If you want a clean, near-invisible look with no permanent changes — do the A-pillar route. If you want full invisibility plus parking mode — hardwire via the fuse box.
- Renting your car or don’t want to touch the trim? Adhesive cable clips are your answer.
- Want a professional-looking install you can undo any time? A-pillar routing is the sweet spot.
- Want to record when parked or deter theft overnight? You need a hardwire kit — no other method works.
- Own a van or SUV with a longer headliner? Budget extra time for the A-pillar route. The principles are identical but the cable run is longer.
For most everyday drivers, the A-pillar and headliner routing method delivers a completely clean result in under 40 minutes at zero cost. If you want parking mode, upgrade to a hardwire kit. Adhesive clips are best as a temporary or rental-car solution only.
Will Hiding Your Dash Cam Wires Damage Your Car or Void Its Warranty?
Tucking a cable behind the A-pillar trim will not damage your car and will not void your manufacturer’s warranty. The trim pops back into exactly the same position it was in before. The only exception is if you use excessive force and snap the plastic clips that hold the trim in place — which is why a proper plastic pry tool matters.
Hardwiring is slightly different. It does not void your warranty outright, but in the UK and EU, the Magnuson-Moss Warranty Act equivalent means a dealer must prove that your modification caused a specific fault before refusing a warranty claim. In the US, the Magnuson-Moss Warranty Act of 1975 protects consumers from blanket warranty voids from aftermarket additions. The FTC confirms this in clear guidance for aftermarket add-ons.
The practical rule is simple. Do not cut factory wires. Use fuse taps or Posi-Tap connectors that add to the existing circuit without modifying it. Keep all connections reversible. If you follow those three rules, you leave zero trace and face zero warranty risk.
Quick Tips for the Cleanest Possible Dash Cam Install
- Mount the camera as close to the rearview mirror as possible — this minimises the amount of cable you need to route.
- Use the shortest cable that reaches — most dash cam cables are 3.5m to 4m long. Coil and cable-tie any excess inside the A-pillar channel so it does not rattle.
- Route on the passenger side if possible — the cable path is identical but you avoid any risk of distraction to the driver during installation.
- Test before you tuck — always power on the camera and confirm it records correctly before pressing the A-pillar trim back into its clips.
- Use a velcro cable tie to bundle excess cable neatly inside the dashboard, rather than leaving it in a loose loop.
- Label your fuse tap with a small sticker if you hardwire — you will thank yourself the next time you need to find the right fuse in a hurry.
Warm your car for a few minutes before routing cables on a cold day. Warm plastic trim is more flexible and far less likely to crack or snap when you pull it away from the body.
Conclusion
You do not need to hide your dash cam wires by law — but every reason to do so makes sense. A clean install removes distraction, deters theft, and makes your vehicle look like the camera was always meant to be there.
Start with the A-pillar routing method. It costs nothing, takes under 40 minutes, and gives you a result that looks completely factory. If you want to record while parked, add a hardwire kit. Either way, that dangling cable from day one will feel like a distant memory.
I’m Alex Rahman, and I’ve seen hundreds of dash cam installs — the ones done right are the ones drivers never think about again. Get it done once, get it done cleanly, and let your camera just do its job.
Frequently Asked Questions

I’m Alex Rahman, a car enthusiast and automotive writer focused on practical solutions, car tools, and real-world driving advice. I share simple and honest content to help everyday drivers make better decisions.